My Husband's Hiroshima-style Okonomiyaki (with photos). Great recipe for My Husband's Hiroshima-style Okonomiyaki (with photos). My husband is from Hiroshima, so he often cooks us delicious okonomiyaki on weekends ♪ ※ Make sure to pour the batter all over the existing batter so that the batter doesn't break and ingredients doesn't come spilling out. Hiroshima, Japan I hope you enjoyed the photos and video of our first day in Japan.
 Okonomiyaki is a savoury pancake-style dish w Hiroshima-style Okonomiyaki is a Japanese savory pancake with cabbage, green onion, bean sprout, noodles, sliced pork belly and egg, topped with savory sauce and Japanese mayo. I would say the important and delicious element for both Hiroshima- and Osaka-style okonomiyaki is the Okonomi Sauce (お. This Hiroshima style okonomiyaki is special to me because it reminds me of one of my trips to Japan. You can have My Husband's Hiroshima-style Okonomiyaki (with photos) using 12 ingredients and 13 steps. Here is how you cook it.
Ingredients of My Husband's Hiroshima-style Okonomiyaki (with photos)
- You need of ● Flour.
- It's of ● Cold water.
- It's of ● Egg (medium).
- It's of ● Dashi stock.
- It's of Bonito flakes.
- It's of Cabbage.
- It's of Bean sprouts.
- It's of Squid tempura.
- You need of Thinly sliced pork belly.
- You need of Green onions.
- Prepare of Eggs.
- Prepare of Okonomiyaki sauce.
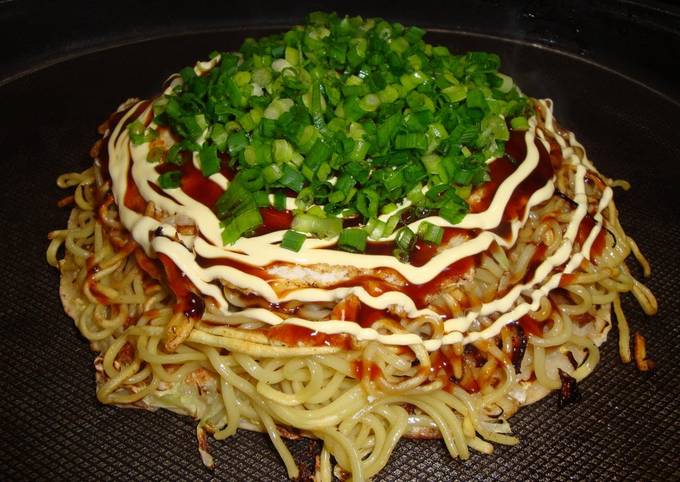
For this variation, we're using yakisoba noodles and adding in a sunny side up egg. It's best served hot off the stove and topped with Kewpie Mayonnaise, Okonomiyaki sauce and of course - aonori, katsuobushi, and shichimi pepper. Hiroshima Okonomiyaki is quite different to the Okonomiyaki (Japanese Savoury Pancake) that I posted some time ago, but equally delicious. It is a layered savoury pancake.
My Husband's Hiroshima-style Okonomiyaki (with photos) instructions
- Put the ● ingredients in a bowl and mix well to make the batter. Mince the green onion and julienne the cabbage..
- Spread the batter thinly over an electric griddle heated to 200°C. Top with a generous amount of bonito flakes..
- Top with cabbage, bean sprouts, squid tempura, and pork belly in this order..
- On top of the pork belly, pour the batter all over. ※.
- Flip it over and press it down. When the shredded cabbage comes out, tuck it under the pancake with a spatula..
- Cover with a lid and steam for about 3 minutes..
- Meanwhile, cook the yakisoba noodles next to the okonomiyaki and season with salt, pepper and okonomiyaki sauce..
- Transfer the okonomiyaki on top of the yakisoba noodles..
- In an open space, break an egg and whisk the yolk and spread it out. Transfer the okonomiyaki on top of the egg..
- Again, cover the okonomiyaki and steam for 2 minutes....
- Flip it over so the egg is on top. Slather with a generous amount of okonomiyaki sauce and top with green onions!.
- Cut it with a spatula and eat while hot ♪ (^o^).
- If you want the egg to be soft set, omit the step 10 and just flip over the okonomiyaki ♪ The creamy and soft set egg is also good ❤.
Each ingredient is placed on top of the pancake in a particular order, making a very thick okonomiyaki. You will need either a flat rectangle griddle pan over stove/BBQ, electric flat griddle or two frypans on the stove top. Find the perfect hiroshima style okonomiyaki stock photo. No need to register, buy now! Find the perfect hiroshima okonomiyaki stock photo.
Comments
Post a Comment